Installing Mikrotik Cloud Hosted Router on Oracle Cloud: A Step-by-Step Guide
Setting up a MikroTik Cloud Hosted Router (CHR) on Oracle Cloud is not a plug-and-play process since the CHR image isn't available in Oracle's marketplace (as of time of writing). But don’t worry—I’ll guide you through every step of the setup, ensuring your router is secure, functional, and accessible.
what you need to achieve this:
- A device (mobile phone or pc)
- An internet connection
- A debit card (make sure you use one there is no cash in it)
Step 1: Download the MikroTik CHR Image
-
Visit the MikroTik official image download website.
-
Download the latest CHR image in VMDK format—this format is crucial for Oracle Cloud deployment.
Step 2: Set Up Your Oracle Cloud Environment
To host the MikroTik CHR, you need an Oracle Cloud account with a properly configured network and storage.
Note: this is where you will use the empty debit card to setup an account.
Networking Setup: Virtual Cloud Network (VCN)
When you finish creating an account and finally log into your account;
- Go to Oracle Cloud Console → Networking → Virtual Cloud Network (VCN) → Security Lists .
- This is where all your ingress and egress rules are managed.
- For security reasons, in ingress disable SSH access at this stage to prevent unauthorized access to your created instance.
- This ensures the instance isn't exposed before it’s fully set up.
Step 3: Upload the MikroTik CHR Image to Cloud
Since MikroTik CHR isn't available on Oracle's marketplace, you need to upload the image manually:
- Create a Storage Bucket in Oracle Cloud.
- Upload the CHR VMDK image to this bucket.
- Later, when setting up the instance, we will reference this bucket to install the router.
Step 4: Create and Deploy the CHR Instance
-
Navigate to Compute → Instances.
-
Create a new instance.
- Make sure to keep everything at Always Free-Eligible
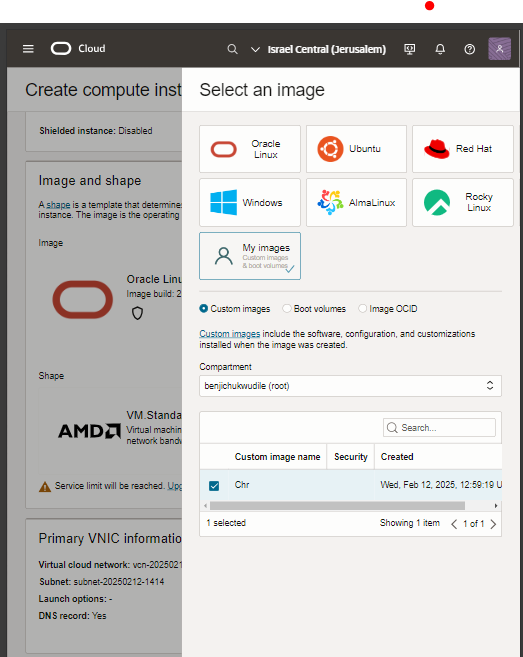
- Change the Image to the CHR you uploaded to the bucket.
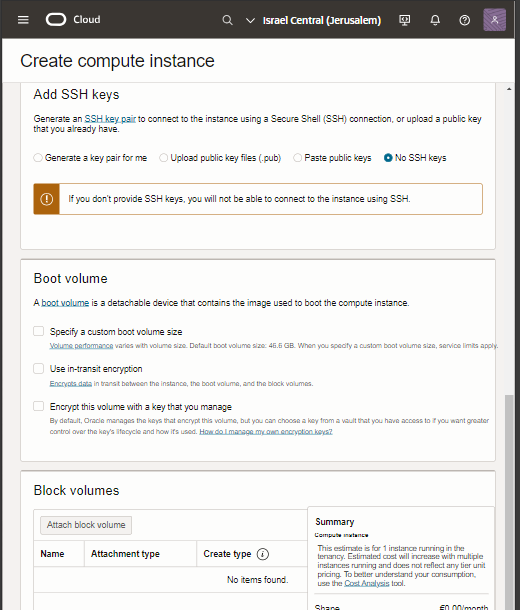
- Under the Add SSH keys, click no ssh keys
- Under Boot Volumes, uncheck any options there.
-
Once the instance is up, log into the router via the Oracle Cloud Console terminal.
- The console will automatically log you into MikroTik CHR for the first time.

- The console will automatically log you into MikroTik CHR for the first time.
Step 5: Secure the Router & Enable Remote Access
- Change the default password to secure the router.
- When logged in in the oracle shell, mikrotik will require you to change password before proceeding.
- Return to Networking > Virtual Cloud Network (VCN) > Security Lists > Ingress and re-enable the SSH rule for remote management.
Step 6: Connect to MikroTik CHR via Terminal or WinBox
With an internet connection, you can now:
- Log into the CHR via SSH using a terminal.
ssh admin@Your_Public_IP //change Your_Public_IP to your instance IP - Use WinBox, MikroTik’s graphical management tool, for an easier setup experience.
Step 7: Enabling Web Access to MikroTik CHR
If you need to access the MikroTik WebFig (GUI):
-
Go to Oracle Cloud Console → Networking → Virtual Cloud Network (VCN).
-
Under Security Lists, go to Ingress Rules and allow:
-
Port 80 (HTTP) for basic access.
-
Port 443 (HTTPS) for secure access.

-
Setting Up HTTPS (Port 443) for Secure Web Access
- To avoid exposing data over HTTP, you can enable HTTPS using an SSL certificate.
- You have two options for SSL certificates:
- Self-Signed Certificate (Recommended for personal use).
- Certificate Authority (Let's Encrypt or other CA) (Requires a domain name).
- If you don’t want to buy a domain, you can use free DDNS services.
- However, since this guide is for a completely free setup, a self-signed certificate is the best choice.
Step 8: Accessing MikroTik WebFig
- Open any web browser and enter the public IP address of your instance.
- If using HTTPS, your browser will likely display a security warning (since it's a self-signed certificate).
- Simply click "Advanced" and proceed. There's no risk, as it's your own CHR instance.
- HTTP access won't show any errors, but keep in mind that your ISP or any middleman could intercept your traffic.
Step 9: Full Remote Access to MikroTik CHR
Once set up, you can access the router using:
✅ Terminal (SSH or Telnet) - use your mobile device (termux) or PC (terminal)
✅ Web Browser (WebFig - HTTP/HTTPS)
✅ WinBox (MikroTik’s GUI tool)
Final Thoughts
Congratulations! 🎉 You’ve successfully deployed a MikroTik CHR on Oracle Cloud—completely for free! Now, you have a powerful cloud router at your disposal for remote networking, firewall management, VPN configurations, and more.